Monthly Archives: December 2009

WSIM Error in Windows 2008 SP1 for Autoattended File Creation

Part of the MCITP course requires the learning of Windows Deployment Services (WDS), and I decided to give this a shot before my training class starts again. My setup is a s follows:

My first VM is a domain controller (DC1) with all the required services installed for WDS to work properly. What are those requirements? Let’s see these requirements and their command line installation parameters!

1. DNS (servermanagercmd -install DNS)

2. AD (run dcpromo.exe)

3. DHCP (servermanagercmd -install DHCP)

4. WDS (servermanagercmd -install WDS)

After all of this is done and you have configured your WDS server, next is the creation of an autounattended file to cut down on the manual interaction during a Windows OS install. Before you proceed in this file creation, the Windows Automated Installation Kit (WAIK) is needed. The version that I am using is from way back in 2007. After starting Windows System Image Manager (WSIM), I selected the install.wim file from the root of my C: drive after I copied it from the DVD. As WSIM was processing the file, I received this error message with an attached log file:

“The specified location contains a Windows image that is not compatible with the current version of Windows.”

All of this made no sense as I worked with the exact version of the Windows 2008 file. I googled the error and found that the WAIK version I had was old and doesn’t support Windows 2008, but there is a new version. I downloaded and installed this new version of WAIK. WSIM started and finished processing the image file with no errors, and I was able to successfully produce the autounattended file for srevr 2008 deployment.

Links for WAIK:

New Version

Old Version

Keyboard Shortcuts for Windows 7 VPC

Yesterday I tried the VPC 2007 keyboard shortcut (Alt-R+Enter) for full-screen mode using Windows 7 version of VPC, and it did not work. I started scratching my head, kept trying many “Alt-R” hot key combination, and couldn’t find an answer as to what works in this new version. Sure enough, I found what I was looking for through the Google search engine. The new hot key for Windows 7 VPC version is “Ctrl+Alt”. So how to get to full screen mode? Try “Ctrl+Alt+Break”, and it does not matter which Ctrl or Alt key is used, that is right or left of the keyboard. Now full screen mode is activated; press it again, and full-screen mode is deactivated. I was very happy with the results but that was not all…other articles stated that the “Windows Key” could also be used. What! If your VPC is in full-screen mode, deactivate that mode. Let’s use this other hot key. Make sure that your VPC window is selected (active window), and try the combination of “Windows Key+Up Arrow”. Mind blowing! It also works, just as well as the “Ctrl+Alt” host key, but with one caveat, getting out of full-screen mode. The Windows Key will not let you out of full-screen mode when using that combination; that is alright because we have our other hot key combination to help out–“Ctrl+Al+Break”. Even though the “Age of Discovery” is long passed and gone, I think we should bring it back to discover other keyboard shortcuts using both hot keys for Windows 7 VPC. In case you were wondering about the Windows key, here is a picture:

Windows key on your keyboard

Setting up a VM on VPC in Windows 7

Going back to a previous post where a Windows 7 link was added for VPC, this article will cover the basics of a VM setup. This setup will take place on the Windows 7 Professional 64-bit platform. Installation of VPC on Windows 7 is much easier this time around. The file that you will download is packages as a .msi and is installed an update for Windows 7. What does this mean? After downloading the correct version of VPC, double left-click on the file; THAT’S IT!

Windows 7 VPC

Steps:

1. Access VPC via the Windows—>All programs method. (It’s always easier to “pin” a program that will be used constantly.)

2. First time display of VPC in Windows 7:

VPC display afetr start-up

3. Click “Create virtual machine”:

Create virtual machine screen

4. Enter a name for the VM; secondly, as covered previously, choose a location to save the VM.

5. Clicking “Next” leads to RAM and Networking screen.

RAM and Networking Screen

6. Because of my RAM limitations, I left things at default settings. For more information and to make an informed decision on these settings, take a look at the “more about…” links as seen in the picture.

7. Once you have made a decision on the above settings, it’s time t create the Virtual Hard Disk.

Virtual Hard Disk Screen

8. Since this is the first time creating a virtual hard disk, choose the third option. Also, check “Enable Undo Disks” option. What does choosing the third option do?

Options for space allocation of VHD

9. Choosing the “Fixed: options always works best for me since I know my physical hard disks space limitations. Please remember that virtualization is dependent on CPU, RAM and Hard Disks.

10. Our last step is upon us, where VPC will ask for a save name and location for the VHD.

11. On the following screen, you will have to specify a fixed capacity before the VHD can be created. VPC sets a default size of 16,384MB, but you can specify less or more depending on your tasks.

Setting VHD Capacity

12. The VHD will now be created. A screen will appear showing the progress of creating the VHD. Depending on the size specified in setp 11, time can be short or long. A successful message will show up after VHD creation.    You can close that box.

13. Final Results
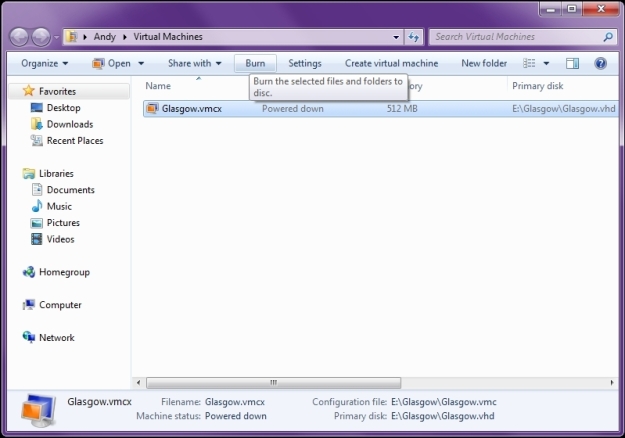
13. Right-click on VM where you will install OS. You can choose “Open” or “Settings”. Choose “Settings” first.

As you can see, this is still the same look as VPC 2007. However, there is one change that I consider important. Select DVD Drive and pay attention to the right column. What do you see?

Open an ISO Image option

Well, now there is “Open an ISO Image” option. In VPC 2007, we would have to start the VM then choose “Capture ISO Image” option if installing from an OS image. Now, we can preset the image then start the VM.

14. Let’s choose the “Open” option. The VM is started but goes all the way to the PXE boot. Click on “Tools” of the Menu Bar. Are we given an option to capture ISO image? NO. The options that “Tools” give us are Integration Features and Settings. This is why it’s important to select Settings first rather than starting the VM. Also, on the menu bar, there’s a new clickable command–Ctrl+Alt+Del; this makes resetting the VM easier. The Action Menu gives two options–Sleep and Close.

There you go folks, a very tedious explanation of setting up a VM in Windows 7 VPC, not installing the OS.


Installing Virtual Box v3.10 on Windows 7 Pro 64bit

Virtual Box (VBox) is yet another free virtualization program that is produced by Sun and used by many. It’s almost double the size of Microsoft’s Virtual PC 2007 (VPC), more robust–features, and packaged as 32/64bit simultaneously. More importantly, it has more processes running in the background when compared to VPC; thus, make sure that there is enough RAM on your machine. Let’s get started! The version that is being used was recently released at the end of November and is available for free on the download page of Virtual Box’s website.

Steps:

1. Download the newest version of Virtual Box based on your OS type. On the downloads page, you will see a list of supported OS.

2. Double left-click on the file you have just downloaded.

3. Follow the install wizard.

VPC Hot Key

Using regular keyboard shorts will not work in VPC, for example, after starting up a VM, press Ctrl+Alt+Del, what happens? What happens is not the login screen of the VM, but the task manager of the host machine that VPC is installed on. To prevent this from happening again, VPC has a hot key—the right ALT key. Instead of pressing Ctrl+Alt+Del, try pressing Alt(R)+Del. the result is now the login screen for the VM. To learn more about other keyboard shortcuts, click on Action in VPC and you will see these shortcuts in parentheses. Also, just google “keyboard shortcuts in Virtual PC” and load up any of the results.

Adding a VM in VPC

A continuation from my previous post on VPC, this time is about adding a virtual machine (VM) within the virtualization program. In this example , we’ll be able to see all the various options presented by the program for adding a VM. Just fire up VPC…

After the splash page…it looks like this since no VMs were ever added:

Startup Screen

1. On the wizard, click next.

2. Select “Create a virtual machine” — which will be the first of many; then click next.

3. Specify a name for the VM and save it wherever you like, click next. Refer to Note 1.

4. This screen presents the options for OS types and their minimum hardware requirements (HDD & RAM). Choose of your liking, and click next.

5. The memory screen allows you stick with the default settings from the previous screen, or to manually adjust the the memory size to your liking. Stick with it, or adjust—choose one. Click next.

6. Now it’s time to add a virtual hard disk that will be specific to the VM. Choose “A new virtual hard disk”, click next.

7. Just as in step 3, perform the same actions and refer to Note 1. Please note that you should also specify disk size. Refer to Note 2.

8. Click next, then a summary screen appears and now you can click finish.

9. Now your VPC Console should look like this:

VPC Console

10. If you need to manipulate settings, click on the Settings button, otherwise, click on Start to begin OS installation. If you’re unhappy with everything, just remove it and start anew.

Note 1

It’s best practice to save the VM in a partition other than that of the OS.  As a VM gets bigger, it will use up more hard disk space.

Why would a VM get bigger? Well, simply put, think of the VM as another OS; as you install more software, more space is used up. If you had saved the VM on the partition where the OS resides, less space would be available on that partition. Things would slow down a great deal—VM uses hardware components—HDD & RAM.

Note 2

Choosing the hard disk capacity totally depends on what is your task for the VM. If you just want to practice, then no more than 10GB. If you’ll be hardcore, installing lots of software and performing windows update, then allot 20GB+.

Installing Microsoft Virtual PC 2007 SP1 on XP-64bit SP2

VPC, otherwise known as VirtualPC, is a small virtualization software provided by Microsoft(MS) for free. It’s an easy-to-use program that I came across in my MCITP class, and recommended by both the MS textbook and instructor. VPC is useful for future techs who plan on becoming certified and don’t quite have the expensive PC specs of today’s ever-growing tech industry; as you can tell by now, I am one of those future techs.

VPC Link:

For Windows 7

For all other Windows OS

Steps:

1. Download VPC based on what OS you are using.

2. Follow the install wizard.

3. Install update for VPC 2007 SP1, click here.

4. Install security update for this version, click here. A restart may be needed here.

5. Since I use this program frequently, I pinned it on my start menu; otherwise, you can create a desktop shortcut.